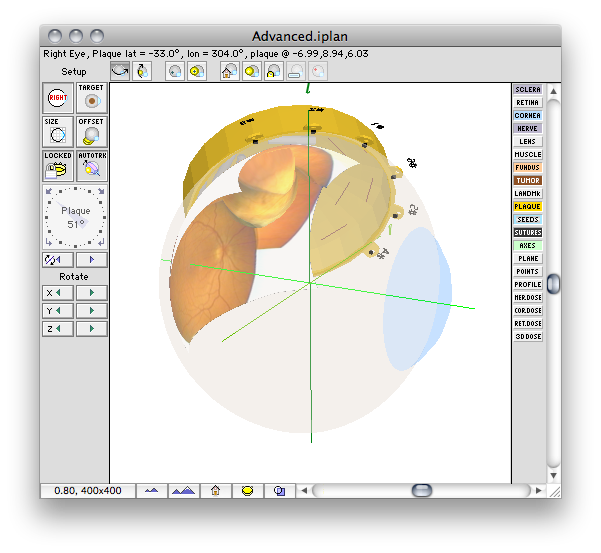
The Setup window provides a 3D graphical view of the plaque, eyelets, anatomy and the scleral suture coordinates. The 3D model acts like a "trackball". To rotate the 3D model of the eye simply click anywhere on the eye (except on the plaque) and drag. To position the plaque on the eye, simply click on the plaque and drag. In addition to the buttons in this window, numerous other setup parameters are adjustable from the Eye, View, and
Setup menus which appear on the menu bar any time this window is frontmost.
The buttons on the left of the Setup window (from top to bottom) control various setup parameters:
- Eye - selects left or right eye.
- Target - rotates the model for best view of the tumor base.
- Size - opens the eye size dialog.
- Offset - opens the plaque offset dialog.
- Lock - prevents the plaque from being moved when rotating the eye in "trackball" mode.
- Autotrack - forces the 2D planar dosimetry surface (e.g. meridian or equatorial) to move with the plaque.
- Plaque rotation - rotates the plaque around its central axis. The arrows on this control rotate the plaque clockwise or counter clockwise in 1 or 90 deg. increments. You can enter the plaque angle from the keyboard by double clicking on the text field at the center of the control. You can also drag the indicator.
- Plane position - this pair of directional controls immediately below the plaque rotation control adjust the position of the 2D dosimetry surface selected in the Dosimetry window. The surface can be either a meridian or equatorial plane. The meridian plane rotates around the Anterior-Posterior (AP) axis of the eye. The equatorial plane is perpendicular to the AP axis and can be moved between the two poles.
- Rotate model - this group of six green directional controls rotates the 3D model around the indicated coordinate axis.
The buttons along the bottom of the Setup window (from left to right) adjust the 3D camera:
- Far - reduce maginification, moves the 3D viewpoint away from the eye.
- Near - increase maginification, moves the 3D viewpoint towards the eye.
- Home - centers the eye in the window and returns to the original magnification.
- Appearance - controls the appearance of rendered elements.
The buttons along the right side of the Setup window (from top to bottom) determine which anatomic and geometric elements are rendered in the 3D model:
- Sclera - Renders scleral surface.
- Retina - Renders retinal surface.
- Cornea - Renders corneal surface.
- Nerve - Renders the optic nerve.
- Lens - Renders the lens.
- Muscle - Renders the approximate locations at which muscles attach to the eye.
- Fundus - Textures the retinal surface using a digitized fundus photo.
- Tumor - Renders the tumor volume.
- LandMk - Renders digitized landmarks such as blood vessels.
- Plaque - Renders the plaque.
- Seeds - Renders the radioactive sources.
- Plane - Renders the current 2D dosimetry surface.
- Points - Renders all point-dose calculation positions.
- Sutures - Renders suture points on the scleral surface.
- Axes - Renders the x,y,z coordinate axes.
- Ret. Dose - Renders dose to the retinal surface.
- 3D Dose - Renders a 3D isodose surface.
Eye Menu |
View Menu |
Setup Menu |
Guide Contents