
MacOSX: step-by-step
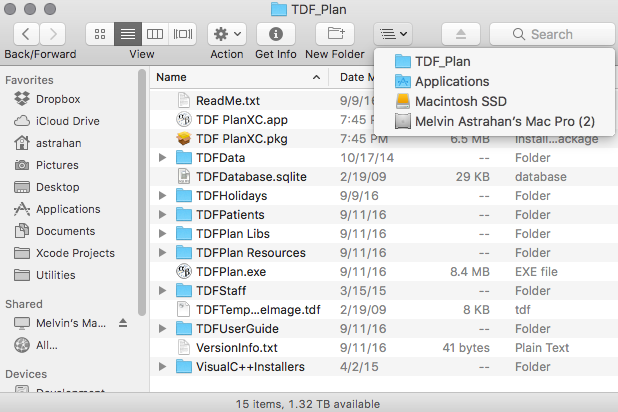
To install TDFPlan on your computer simply drag the entire TDF_Plan folder from the distribution disk (or download location) into your computer's applications folder. In the MacOSX example above, the TDF_Plan folder goes in the Applications folder which is on the boot drive Macintosh SSD of the computer named Mac Pro (2).
For MacOS Sierra (10.12) and later a code signed installer package is required. You can determine this by launching "TDF PlanXC.app" after dragging the expanded TDF_Plan folder into your applications folder. If you encounter file access permission errors, quit TDF PlanXC and run (double click) the "TDF PlanXC.pkg" installer and elect to install on the drive that hosts your applications folder (typically your boot drive, e.g. MacintoshHD). You may need your admin password to complete the install. The installer should overwrite the file "TDF PlanXC.app" with a new version that satisfies MacOS Gatekeeper security. If the new "TDF PlanXC.app" is instead placed into your Applications folder, manually drag it into the TDF_Plan folder and overwrite the existing "TDF PlanXC.app". Launch TDF PlanXC. The file errors should be gone.
For TDFPlan to run correctly a number of support files and folders must be located in the same folder as the application itself. All of the support files are "cross-platform", ie the same files are used by both the Windows and MacOSX versions of the application. The application folder should be named TDF_Plan. Inside the "TDF_Plan" folder must be the following items:
- TDFPlan.exe (the Windows version of the application)
- TDFPlan Libs (a folder containing .dll libraries used by the Windows version)
- TDFPlan Resources (a folder containing picture resources used by the Windows version)
- TDF PlanXC.pkg (the application installer for MacOS 10.12 and greater)
- TDF PlanXC.app (the application for MacOSX 10.11 and earlier)
- TDFDatabase.rsd (the local SQL database file)
- ReadMe.txt (this file)
- TDFData (a folder containing biological data and settings presets)
- TDFPatients (a folder in which to save local copies of patient files, also includes some worked examples)
- TDFStaff (a folder containing the names and email addresses of the doctors and other treatment planning staff. These files can be edited from the TDF preferences window or can be edited manually with a text editor)
- TDFUserGuide (the HTML user guide is in this folder)
- TDFHolidays (the files in this folder are used to localize the TDF calendar for different countries. These files can only be created using a text editor. Support for additional countries is available upon request.)
- The TDFPlan application will also create various preference settings files in the "Preferences" folder used by your computer's OS. Please do not modify these files.
Windows XP and Vista (later versions of Windows will be similar): step-by-step

For Windows computers, put the TDF_Plan folder into the Program Files folder that is on the C: drive of My Computer. This link takes you to a step-by-step example using the Vista operating system.