
Calendar buttons are found in the Prescription window and elsewhere.
Clicking calendar buttons opens the calendar dialog sheet. This is a modal dialog sheet which blocks its parent window until you exit the sheet.
The Calendar Sheet provides an alternative method of setting dates and times in addition to the MacOS conventional textual date picker controls found in the Prescription and a few other windows. The Rx calendar sheet defaults to the insertion or removal date context depending on which button was used to open it. You can change the calendar sheet context from insertion date to removal date and vice versa using the buttons at the top of the sheet.
Standard MacOS controls are presented in this sheet and are supplemented with custom graphical elements as well. The left and right arrow bumper buttons above the calendar select the prior or subsequent month. The Today button copies the current date and time from your computer's system clock. To change the year you can repeatedly click the monthly arrow bumpers or enter the desired year directly in the textual date picker control under the clock.
To select a day, click on that day in the calendar or use the textual date picker. The calendar also responds to keyboard arrow keypresses when it has the user focus.
To enter a time of day, you can use either the textual date picker control or simply click on the clock face's hourly labels to set the time to the nearest hour or nearby to set half hours. You can drag the minute hand in 1 miute increments. Clicking on the AM/PM indicator or the same clock hour a second time exchanges AM and PM.
The Morning shortcuts are convenience controls that can accelerate selecting times at 5 minute increments between 7 AM and 12 noon. The slider is restricted to 15 minute intervals between 7 AM and noon. For example:
- To select 7:35 AM, you could use the keyboard to enter "7" and "35" in the textual date picker under the clock, or alternatively drag the morning shortcuts slider to 7:30 followed by clicking the +0:05 button to add 5 minutes, or simply drag the minute hand on the clock to 7:35 and then click the AM/PM indicator to toggle between AM and PM if needed.
- To select 2:15 PM, click on 2 on the clock face twice. The first click on 2 sets 2 AM, the 2nd click on 2 adds 12 hours to set 2 PM. Lastly click +0:15 button to add 15 minutes.
Click OK to accept the currently displayed calendar sheet settings and exit the dialog.
The calendar sheet itself offers a graphical overview of the treatment at a glance. Treatment days are highlighted with a pale green (symbolizing "good to go") tint and a small plaque icon. The removal day icon has a white interior. The horizontal location of the plaque icon within a date box indicates the approximate time of day for insertion and removal. For a full day of treatment the icon is horizontally centered. Impossible treatment days (e.g. removal date set prior to implant date), and days that fall outside of your implant duration preference settings (e.g. too few or too many hours) are highlighted with a red warning tint. The background tint for October 15th in the example below features two colors, half green to indicate it is a treatment day and half grey with a thicker grey border to indicate that the 15th is the currently selected removal date.
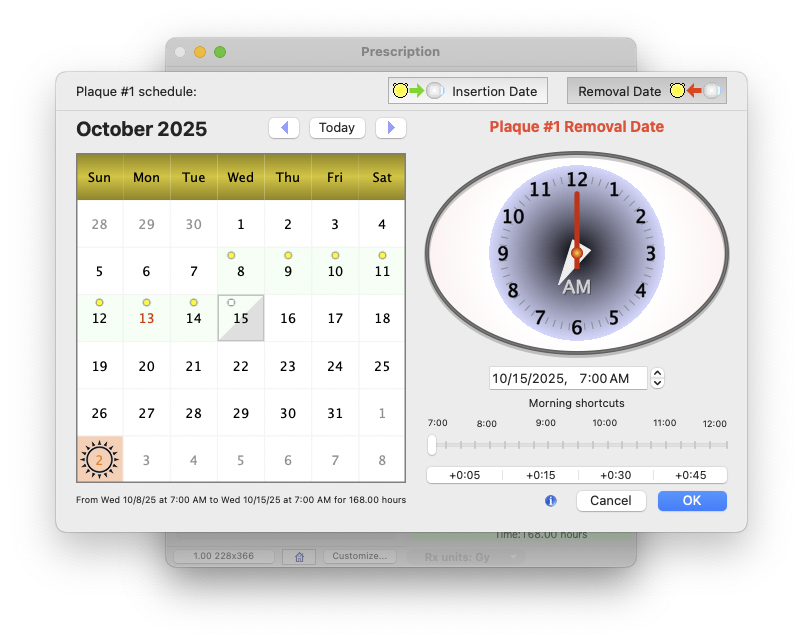
Some special dates in the USA are highlighted with red text (e.g. October 13th is Columbus Day, it is one of the 10 federal holidays) or orange (daylight savings time transition on November 2nd) text. In the example above, The plaque is inserted at 7AM on October 8th, 2025 and removed 168 hours later at 7 AM on October 15th.
Note: in this calendar example, November 2nd is also highlighted to indicate that a clock change occurs due to the conclusion of daylight saving time (DST) for locales that observe DST. Normally, the duration of a one week implant is 168 hours, but in some instances a calendar week can be 167 or 169 hours if a daylight savings clock shift occurs midway through the implant. You can enable or disable observance of DST for your specific locale in your MacOS system Language & Region and/or Date & Time preferences panes using the Set date and time automatically and Time Zone settings.